

Last Updated: October 29, 2026
Quick Summary
A movie scene display is built by choosing one clear moment from a film, selecting characters that belong in it, and arranging them so the scene reads at a glance. Start with a simple scene of three or four characters, and check that all figures share the same scale before you buy.
- Pick one scene, not a whole film, with a single location and a clear moment.
- Convert every figure to the same scale, since a height mismatch breaks the scene.
- Use a three-light setup: key, fill, and a subtle backlight for separation.
- Keep the display out of direct sunlight, which fades paint and warps packaging.
- Start with a three-figure scene on one shelf and expand from there.
Table of Contents
- Choosing the Movie Scene You Want to Recreate
- Selecting Figures and Checking Scale and Compatibility
- Action Figure Display Ideas for Building the Scene
- How to Pose Action Figures for Display
- Lighting and Photography Setup for Your Figure Display
- How to Protect Figures From Dust and Sunlight
- Building Your First Movie Scene Display This Weekend
- Frequently Asked Questions
A movie scene display is one of the most rewarding projects a collector can start. Curating a display with figures means choosing a moment from a film or show, picking characters that belong in it, and arranging them so the scene tells a story at a glance. You do not need a large budget or a spare room to do it well.
Choosing the Movie Scene You Want to Recreate
Start with a scene you already love. The best displays come from a moment that you can picture clearly, whether it is a car chase, a quiet kitchen conversation, or a dramatic reveal.
Follow these steps to narrow your choice:
- Pick one scene, not a whole film. A single location and a clear moment work best.
- Note the setting, such as a street, a garage, or a courtroom. This tells you what props and backdrops you need.
- Count the characters in the scene. Fewer characters mean a cleaner, more readable display.
Watch out: Choosing a scene with too many characters often leads to a cluttered shelf. Start small and add more pieces once your first scene looks right.
Selecting Figures and Checking Scale and Compatibility
Once you have a scene, the single biggest reason a display fails is scale mismatch. A 15 cm figure standing next to a 1:10 statue will read as a giant beside a child, no matter how well you pose them. Before you buy anything, convert every piece to the same unit so you can compare them honestly.
How to compare scales without guessing
Scale is a ratio of figure height to real-world height. A 1:12 figure of a 1.8 m character is about 15 cm tall; a 1:6 figure of the same character is about 30 cm.
Use this quick reference when mixing pieces:
- 1:18, roughly 9-10 cm; suits die-cast vehicles and compact shelf scenes.
- 1:12, roughly 15 cm; the most common action figure scale and the easiest to build around.
- 1:10, roughly 18 cm; often used for statues and deluxe scene pieces.
- 1:6, roughly 30 cm; large, detailed, and hungry for shelf space.
A small die-cast piece is roughly 1:43 scale, so it belongs with vehicles and miniatures, not with 1:12 figures. Treat it as scenery or a background element rather than a character in the scene.
Compatibility beyond scale
Scale is only half the job. Check these before you commit:
- Confirm each figure's scale or height in the product listing, and use these checks before you buy licensed figures online to verify authenticity and scale.
- Check that all pieces come from the same line or film universe
- Measure your shelf space and the scene's footprint, including the tallest pose
- Decide whether you want a fully built set or single figures to combine
A common pattern is to build around one anchor piece and treat everything else as supporting cast. The anchor sets the scale; the supporting pieces must match it or sit clearly in the background as scenery.
Choosing between a built set and single figures
Built sets reduce compatibility risk because the scale, backdrop, and accessories are matched together. They are the faster route to a coherent scene, especially on a small shelf.
If you are building around a desk or a small shelf, look for compact sets. The Fast & Furious - Han's Garage Nano Scene at $49.95 is a good example. Its removable walls and roof let you adjust the layout to fit your space.
Watch out: Mixing scales is not always wrong; a deliberately oversized piece can read as a forced-perspective foreground element, but it only works when the scale difference is obvious and intentional. Accidental mismatch just looks like a mistake.
The article's scale reference gives approximate heights for common figure scales, which you can compare at a glance:
| Scale | Best use |
|---|---|
| 1:18 | Die-cast vehicles, compact shelf scenes |
| 1:12 | Most common action figure scale |
| 1:10 | Statues and deluxe scene pieces |
| 1:6 | Large, detailed figures needing more shelf space |
Action Figure Display Ideas for Building the Scene
Good display ideas turn a pile of figures into a scene. Think about how the characters relate to each other and where the viewer's eye should land first.
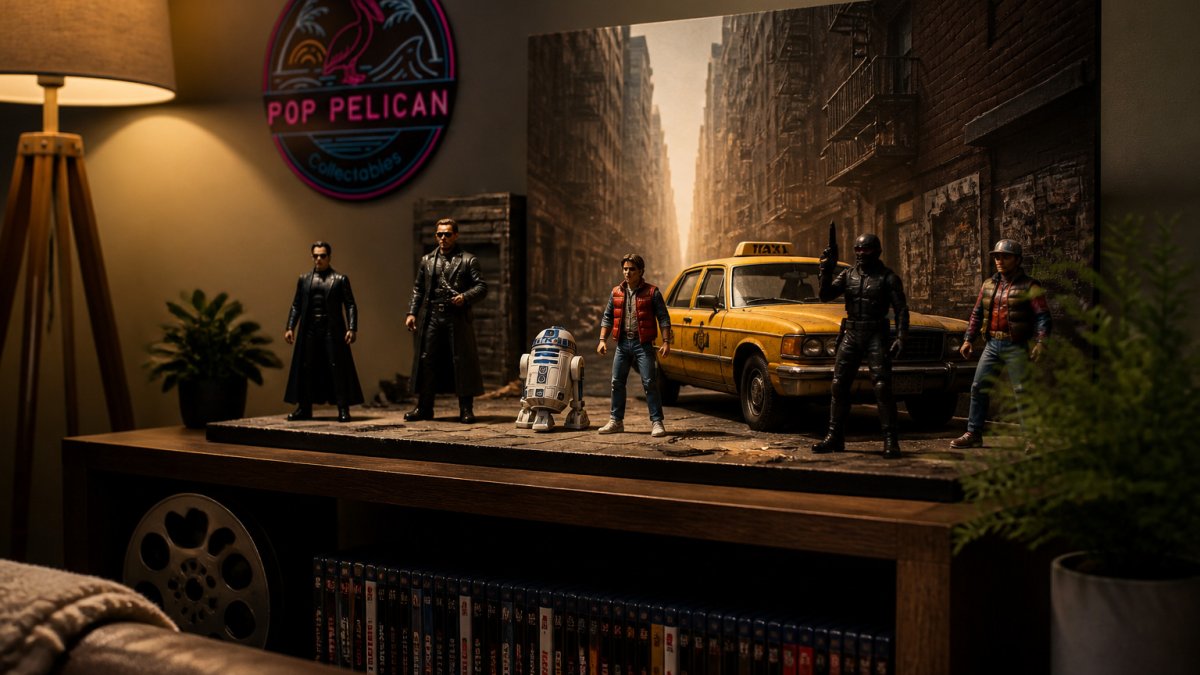
Try these approaches:
Fast & Furious - Han’s Garage Nano Scene →
- Create a focal point. Place your most important character slightly off-centre, at the front or on a raised base.
- Build depth in layers. Put larger pieces at the back and smaller ones in front to make the scene feel real.
- Use a backdrop. A printed panel or painted card behind the figures sets the mood and hides the wall.
- Group by action. Figures facing each other or moving together read as a story, while scattered figures look random.
The Back To The Future - 1.65" Hill Valley Courthouse Diecast Set at $39.95 shows how a ready-made scene can do much of the work for you. Its clock tower square and street details give you a strong base to build on.
If you want to try a more dramatic piece, the Jurassic Park - Two Raptors Deluxe 1:10 Scale Statue at $429.95 is a premium centrepiece. Place it at the front of a shelf so it becomes the focal point, then surround it with smaller pieces.
How to Pose Action Figures for Display
Posing is where your scene comes alive. Look at reference images from the film or show and copy the body language. A figure leaning forward with one foot raised tells a very different story from one standing straight.
Keep these points in mind:
- Match the eye line. Characters talking to each other should look toward one another.
- Keep joints supported. Use small clips or stands for poses that would otherwise sag.
- Vary the heights. Standing, kneeling, and seated figures make a scene more natural.
- Leave space between figures. Crowding makes poses hard to read.
Watch out: Forcing a joint into a pose can crack or loosen it over time. Move slowly and stop if you feel resistance.
Lighting and Photography Setup for Your Figure Display
Lighting changes how a display looks more than almost anything else, and it is the area most guides skip. Soft, warm light makes a scene feel cinematic, while harsh overhead light flattens detail and casts ugly shadows across faces. The goal is to light the scene the way a film would: a key light, a fill, and a little separation from the background.
A three-light setup for a shelf
You do not need studio gear. Three small LED sources will do:
- Key light, place it at roughly 45 degrees to the front and slightly above the figures. This is your main light and sets the mood.
- Fill light, place it on the opposite side at a lower intensity to soften shadows. A piece of white card bouncing the key light works if you do not want a second lamp.
- Backlight or rim light, place a small light behind the scene, aimed at the back of the figures, to separate them from the backdrop. This is what makes a display look cinematic rather than flat.
Keep the key light brighter than the fill, and keep the backlight subtle. If the backlight is too strong it will blow out the backdrop and pull the eye away from the figures.
Colour temperature and mood
Colour temperature is measured in kelvin (K). A warm white around 3000K suits most film moods and flatters skin tones and paint. A cooler 5000-6500K reads as daylight or sci-fi and can make a scene feel clinical. The most common mistake is mixing temperatures; a warm key with a cool fill will make the scene look muddy. Match your lamps, or gel them to match.
Photographing the finished scene
- Photograph from the height of the figures, not from above, to capture the scene as a viewer would see it.
- Use a plain background behind the display so the figures stand out.
- Keep the camera steady; a small tripod or a stack of books is enough.
- Turn off room lights that are not part of your setup, and shoot at night or with curtains closed to control ambient light.
Watch out: Avoid direct sunlight on the display. It fades paint, warps packaging, and creates harsh shadows that no amount of posing can fix. If your shelf faces a window, use a blind or move the display.
How to Protect Figures From Dust and Sunlight
A finished display needs protection to stay in good condition. Dust settles on figures quickly, and sunlight can fade paint over months.
Follow these steps to keep your collection safe:
- Place the display away from windows that get strong afternoon sun.
- Use a glass cabinet or a clear acrylic cover to block dust.
- Dust gently every few weeks with a soft, dry brush.
- Keep packaging intact where possible, since boxes protect figures during moves.
Building Your First Movie Scene Display This Weekend
You now have everything you need for a first build. Set aside one afternoon, choose a simple scene, and work through the steps in order: pick your scene, check scale, plan the layout, pose the figures, set the lighting, and protect the finished piece.
Start small. A three-figure scene on one shelf can look just as impressive as a large display, and it gives you a clear base to expand from. Once your first scene is done, you will know exactly what you want from your next one.
Frequently Asked Questions
How do you choose a movie scene to recreate with figures?
Start with a scene that has a clear focal moment, a small number of characters and a recognisable setting, such as a garage, a courthouse square or a dinosaur clearing. Scenes with one obvious hero shot are easier to frame and read at a glance on a shelf. Pick a scene you actually rewatch, because you will spend time adjusting poses and props. Sets like the Fast & Furious Han's Garage Nano Scene at $49.95 or the Back To The Future Hill Valley Courthouse set at $39.95 already give you a built-in stage, which saves planning time.
How should you arrange figures in a display?
Group figures in a triangle or a loose diagonal so the eye moves across the scene, and place the most important character slightly off centre near the front. Use two or three height levels, with taller figures or elevated props at the back and smaller ones in front. Leave some empty space around the focal figure so it stands out. Check that no figure hides another's face from the main viewing angle before you fix anything in place.
How do you protect figures in a display from dust and sunlight?
Keep the display out of direct sunlight, since UV exposure can fade paint and packaging over time. A closed glass cabinet or acrylic case limits dust far better than an open shelf. Dust the cabinet and figures with a soft brush or microfibre cloth every few weeks, and never use household sprays on painted surfaces. Keep the display away from heaters and damp areas, and check that any small parts are secured so they do not shift during cleaning.
Do I need special lighting for photographing a figure display?
Soft, diffused light from one side usually gives the most readable results, because it shows paint detail without harsh shadows. A small LED light placed at an angle, with a sheet of white paper or fabric to soften it, works well for most shelves. Keep the light source out of the frame and shoot at a slightly lower angle than the figures to make the scene feel more cinematic. Test a few positions before you commit to a permanent setup.


